Documentation
Simulation Use Case
Section titled “Simulation Use Case”Purchasing, Paying and Running Machine Programs
Section titled “Purchasing, Paying and Running Machine Programs”This section describes a complete testing scenario using multiple simulators working together:
- Vending Unit Simulator
- Coin Acceptor Simulator
- Banknote Acceptor Simulator
- Machine Simulator
- Printer Simulator
- Backend Order View
This scenario demonstrates a full transaction lifecycle - from selecting machine programs to payment, execution, receipt generation, and backend verification.
Scenario Overview
Section titled “Scenario Overview”- Add programs to the cart
- Pay using Coin and Banknote simulators
- Start machines via Machine Simulator
- Monitor program execution
- View printed receipt
- Verify order in backend
Step 1 - Select Programs in Vending Unit Simulator
Section titled “Step 1 - Select Programs in Vending Unit Simulator”1.1 Open the Vending Unit Simulator
Section titled “1.1 Open the Vending Unit Simulator”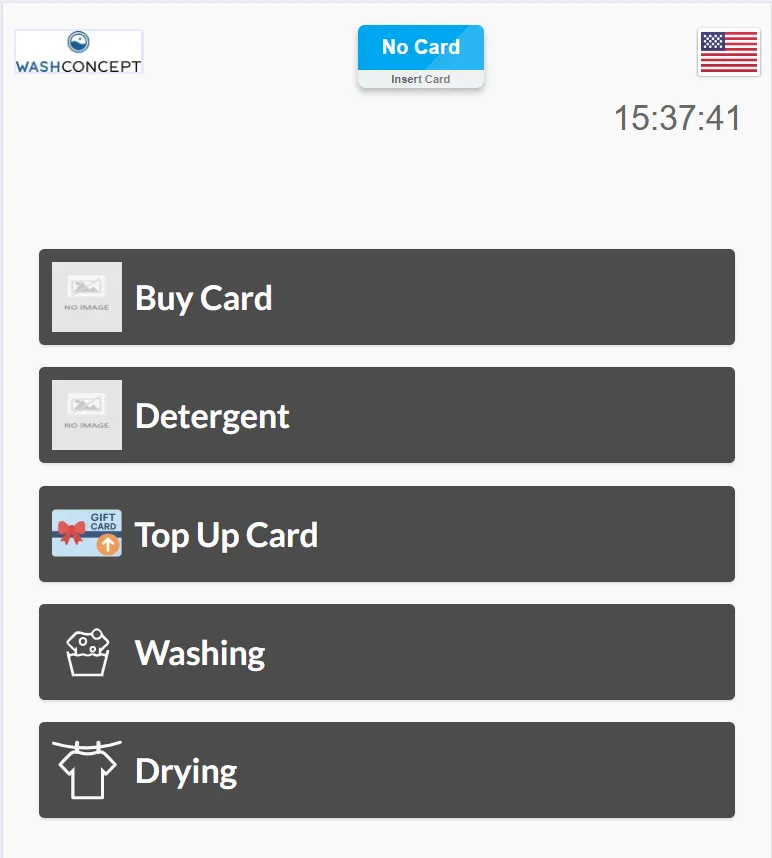
1.2 Select Washing Machine Program
Section titled “1.2 Select Washing Machine Program”- Choose a washing machine (e.g., Washing Machine 1)
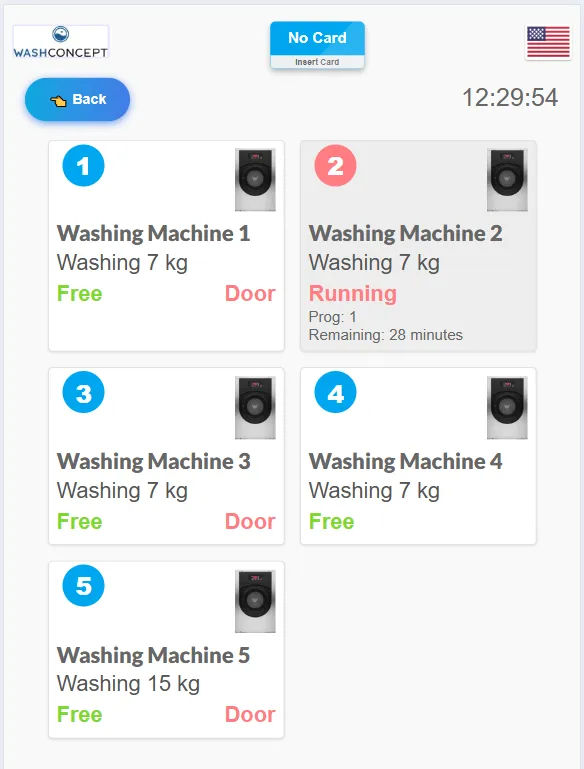
- Select a program (e.g., Delicate Laundry – 4.50€)
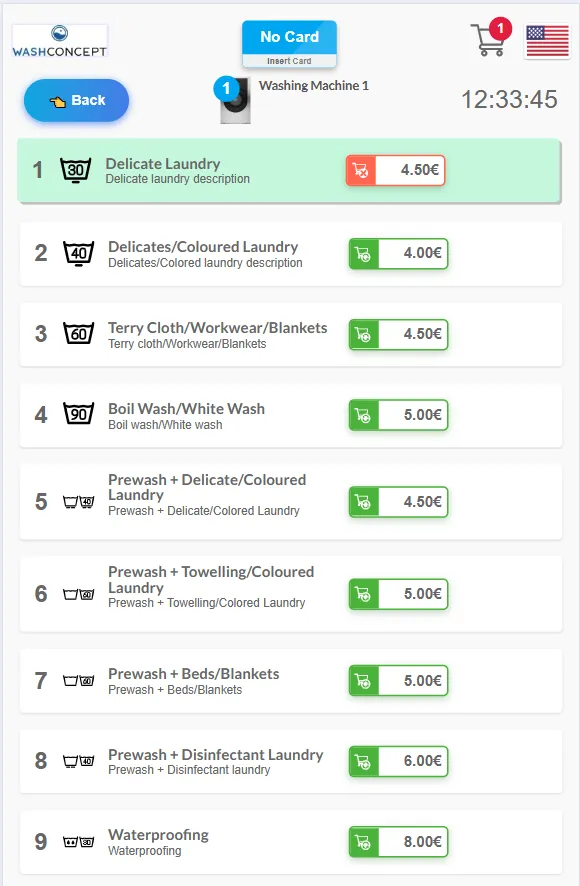
- Add it to the cart
When selecting a new program for a washing machine, the previously selected program in the cart is replaced with the new one.
The cart can contain no more than one program per machine (for example, one washing machine program, one dryer program, and one detergent dispenser program).
1.3 Select Dryer Program
Section titled “1.3 Select Dryer Program”- Choose a dryer (e.g., Dryer 6)
- Select a program (e.g., 10 Minutes – 1.50€)
- Add it to the cart
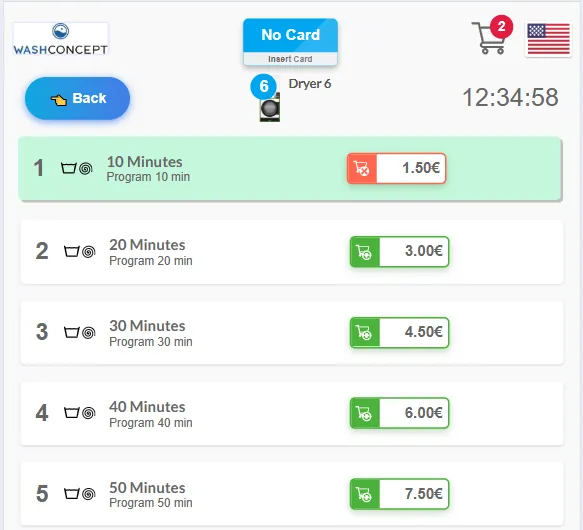
The cart icon updates with the number of selected items.
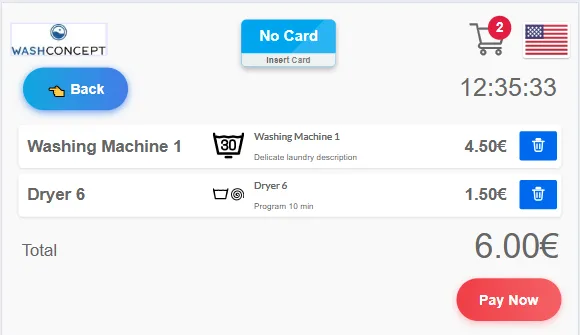
Step 2 - Review Cart and Proceed to Payment
Section titled “Step 2 - Review Cart and Proceed to Payment”Open the cart page.
The cart displays:
- Selected machines
- Program names
- Individual prices
- Total amount
Example:
- Washing Machine 1 – 4.50€
- Dryer 6 – 1.50€
- Total: 6.00€
Click Pay Now.
Step 3 - Payment via Coin & Banknote Simulators
Section titled “Step 3 - Payment via Coin & Banknote Simulators”Next screen - the payment page.
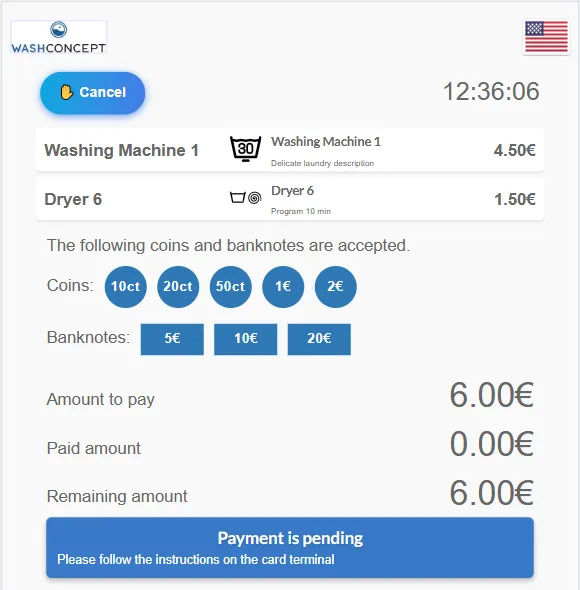
It shows:
- Accepted coin denominations
- Accepted banknotes
- Total amount
- Paid amount
- Remaining amount
Example:
- Total: 6.00€
- Paid: 0.00€
- Remaining: 6.00€
3.1 Insert Coins (Coin Acceptor Simulator)
Section titled “3.1 Insert Coins (Coin Acceptor Simulator)”Open the Coin Acceptor Simulator.
- Select a denomination (e.g., 1.00€)
- Click Insert Coin
- Observe log output confirming:
- Channel mapping
- Sorting path
Repeat until partial payment is completed.

3.2 Insert Banknotes (Banknote Acceptor Simulator)
Section titled “3.2 Insert Banknotes (Banknote Acceptor Simulator)”Open the Banknote Acceptor Simulator.
- Select denomination (e.g., 5.00€)
- Click Insert Bill
- Confirm acceptance in log
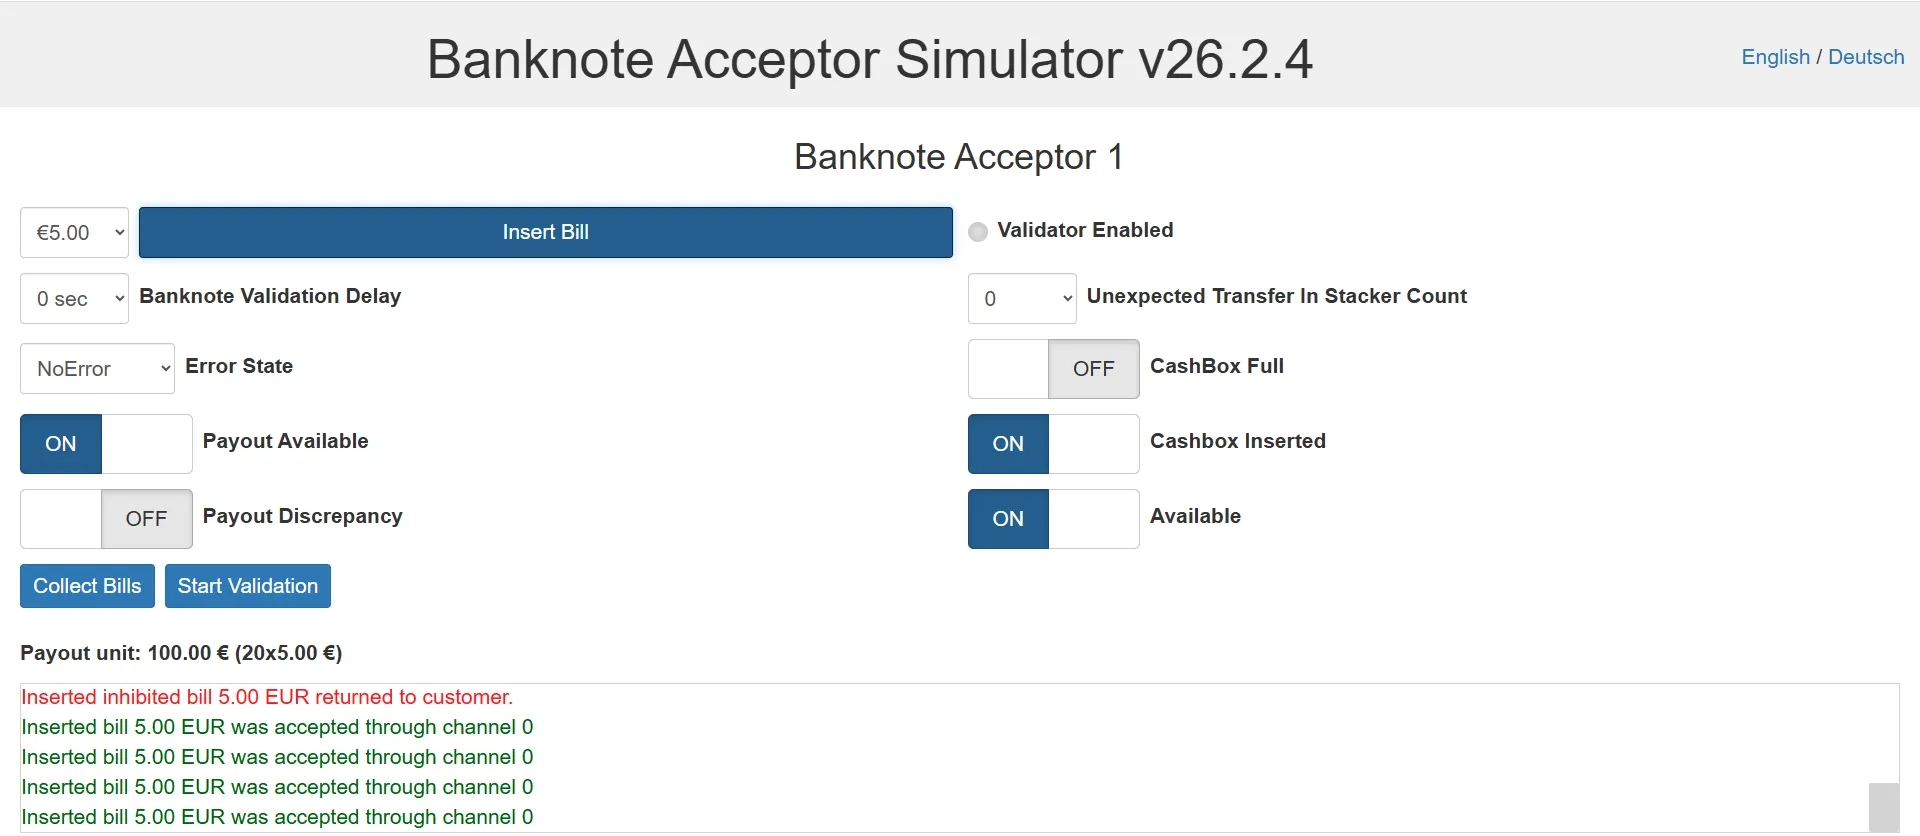
If overpayment occurs, system simulates payout.
When total paid ≥ required amount, transaction completes.
Step 4 - Payment Confirmation
Section titled “Step 4 - Payment Confirmation”After full payment:
- Screen displays Payment Successful
- Instructions appear to close the machine doors and press Start
- Receipt preview becomes available
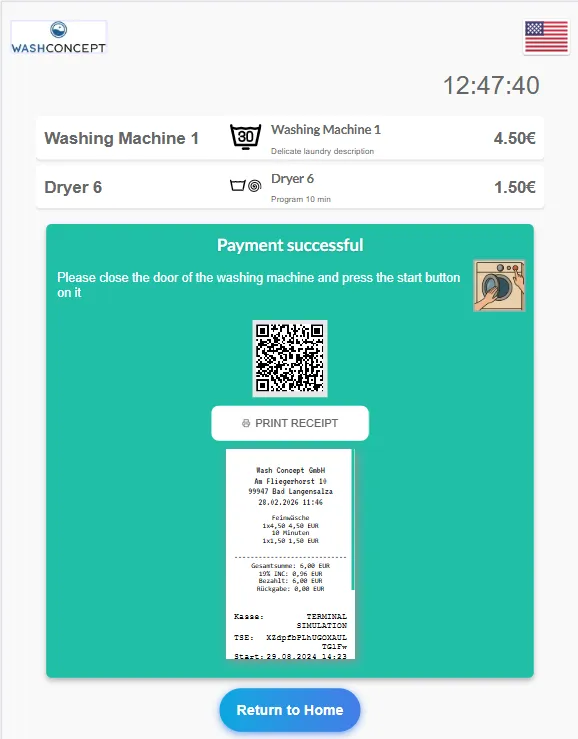
The system transitions to machine activation state.
Step 5 - Start Machines (Machine Simulator)
Section titled “Step 5 - Start Machines (Machine Simulator)”Open the Machine Simulation Dashboard.
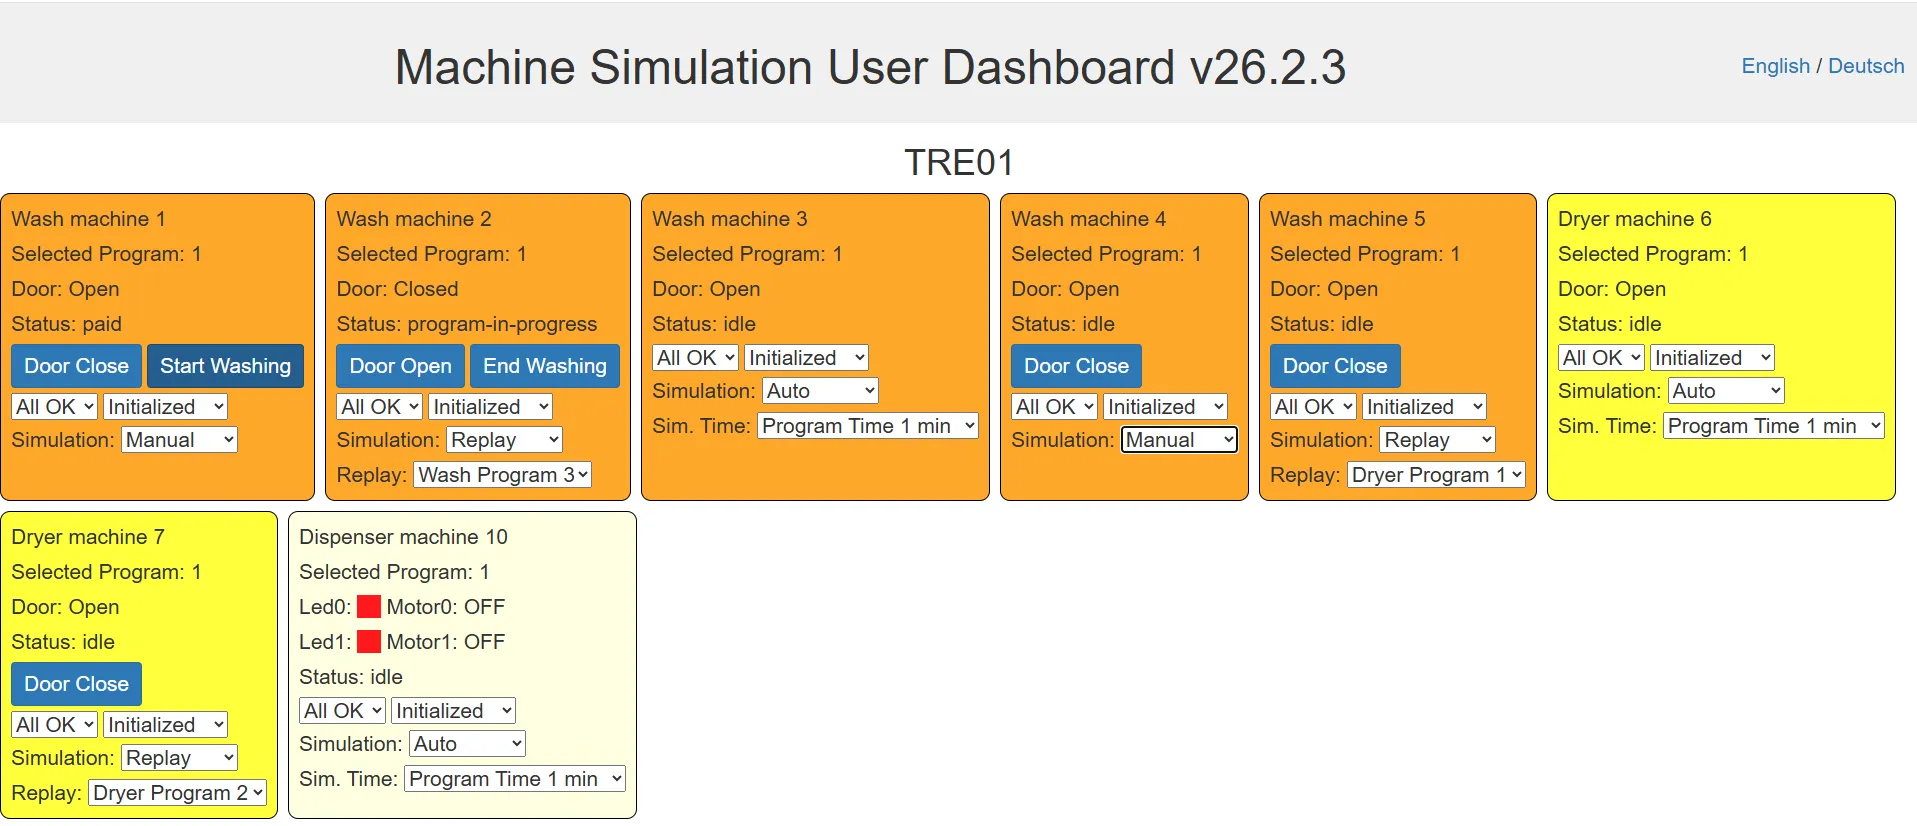
For each purchased machine:
5.1 Close Door
Section titled “5.1 Close Door”- Click Door Close
5.2 Start Program
Section titled “5.2 Start Program”- Click Start Washing or equivalent action
Machine status changes:
- From
Free→Running - Remaining time becomes visible
- Program number is displayed
Step 6 - Monitor Machine Execution
Section titled “Step 6 - Monitor Machine Execution”Service Simulation Page displays:
- Current status (Running / Finished)
- Program number
- Remaining time
- Door state
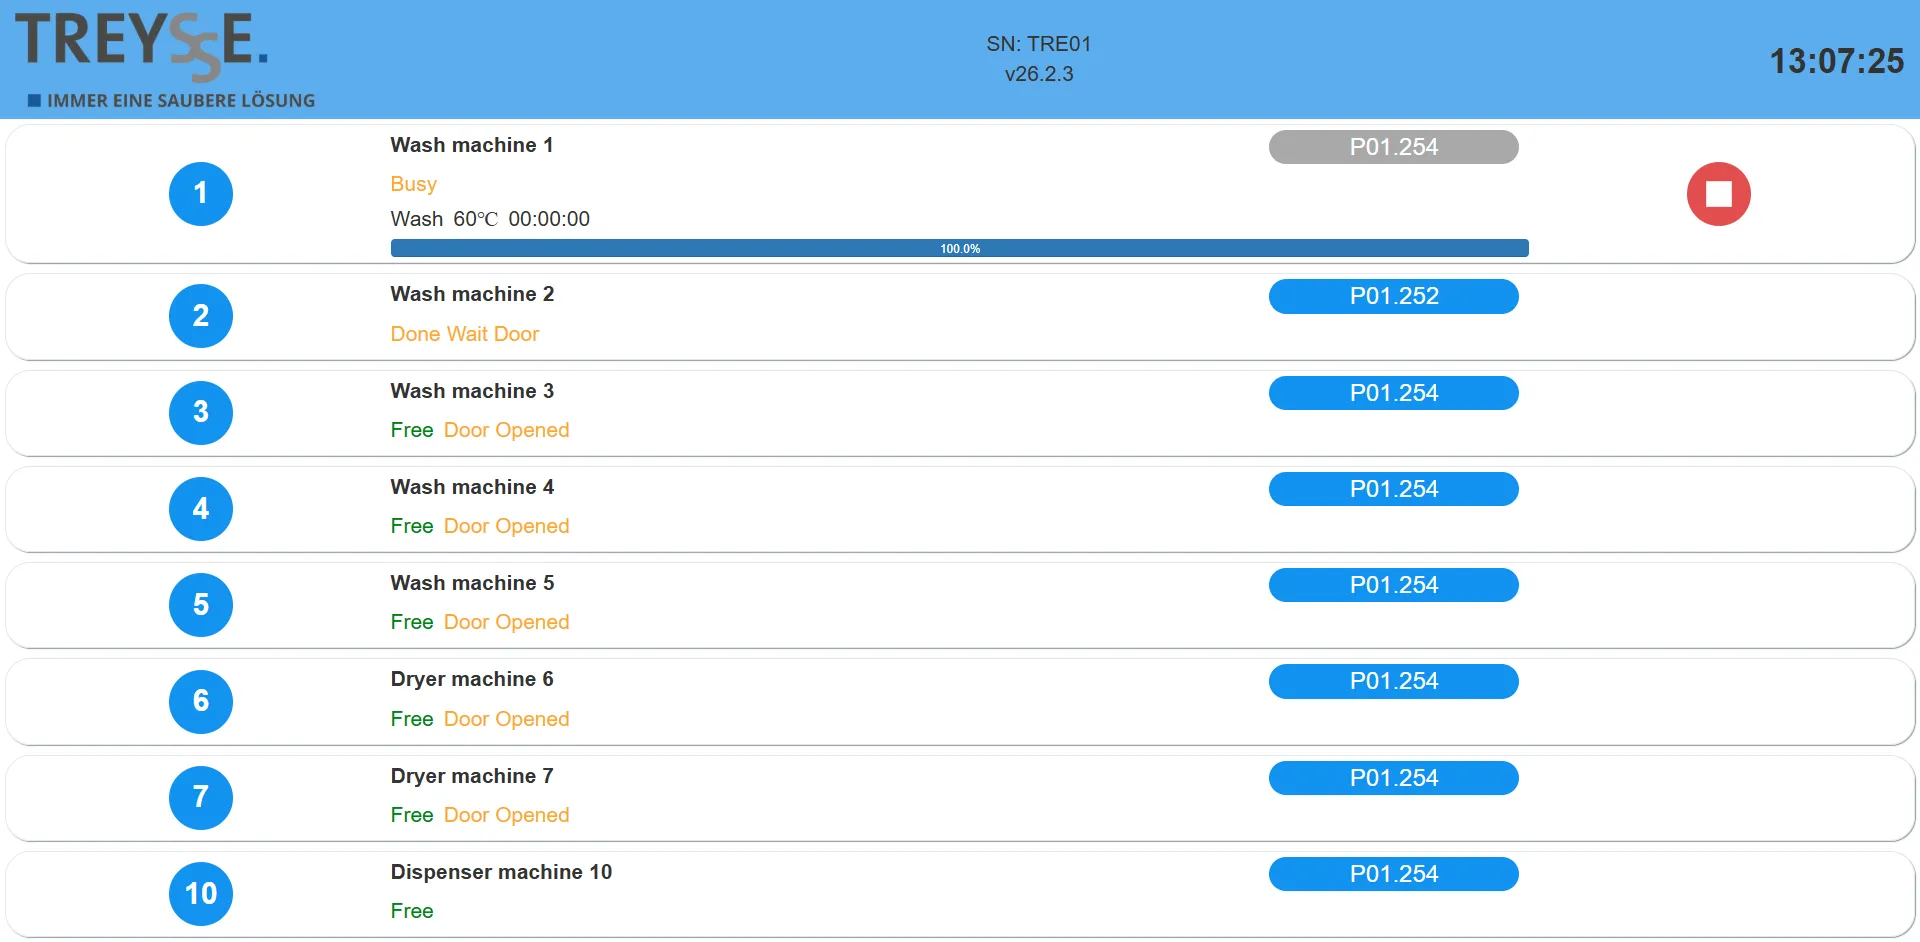
You can:
- Observe countdown
- Force stop if needed
Once program completes:
- Status changes to Finished
- Machine becomes available again after reset
Step 7 — View Receipt (Printer Simulator)
Section titled “Step 7 — View Receipt (Printer Simulator)”Open the Printer Simulator.
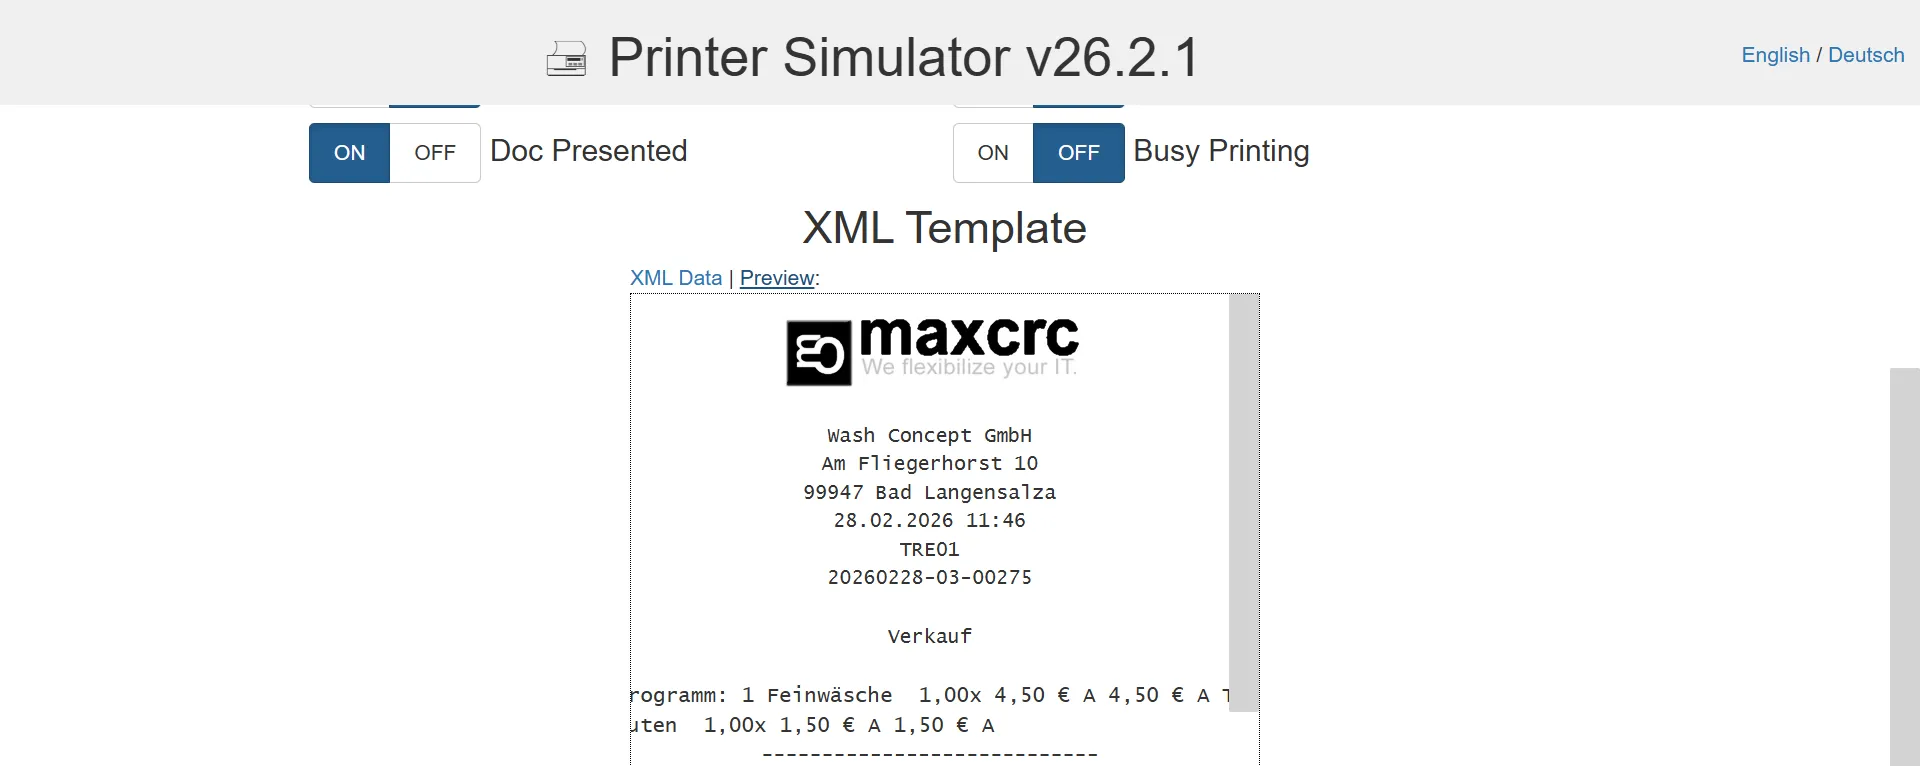
You can:
- View XML template
- See receipt preview
- others
Step 8 — Backend Order Verification
Section titled “Step 8 — Backend Order Verification”In the backend system:
- Navigate to Sales
- Locate the transaction
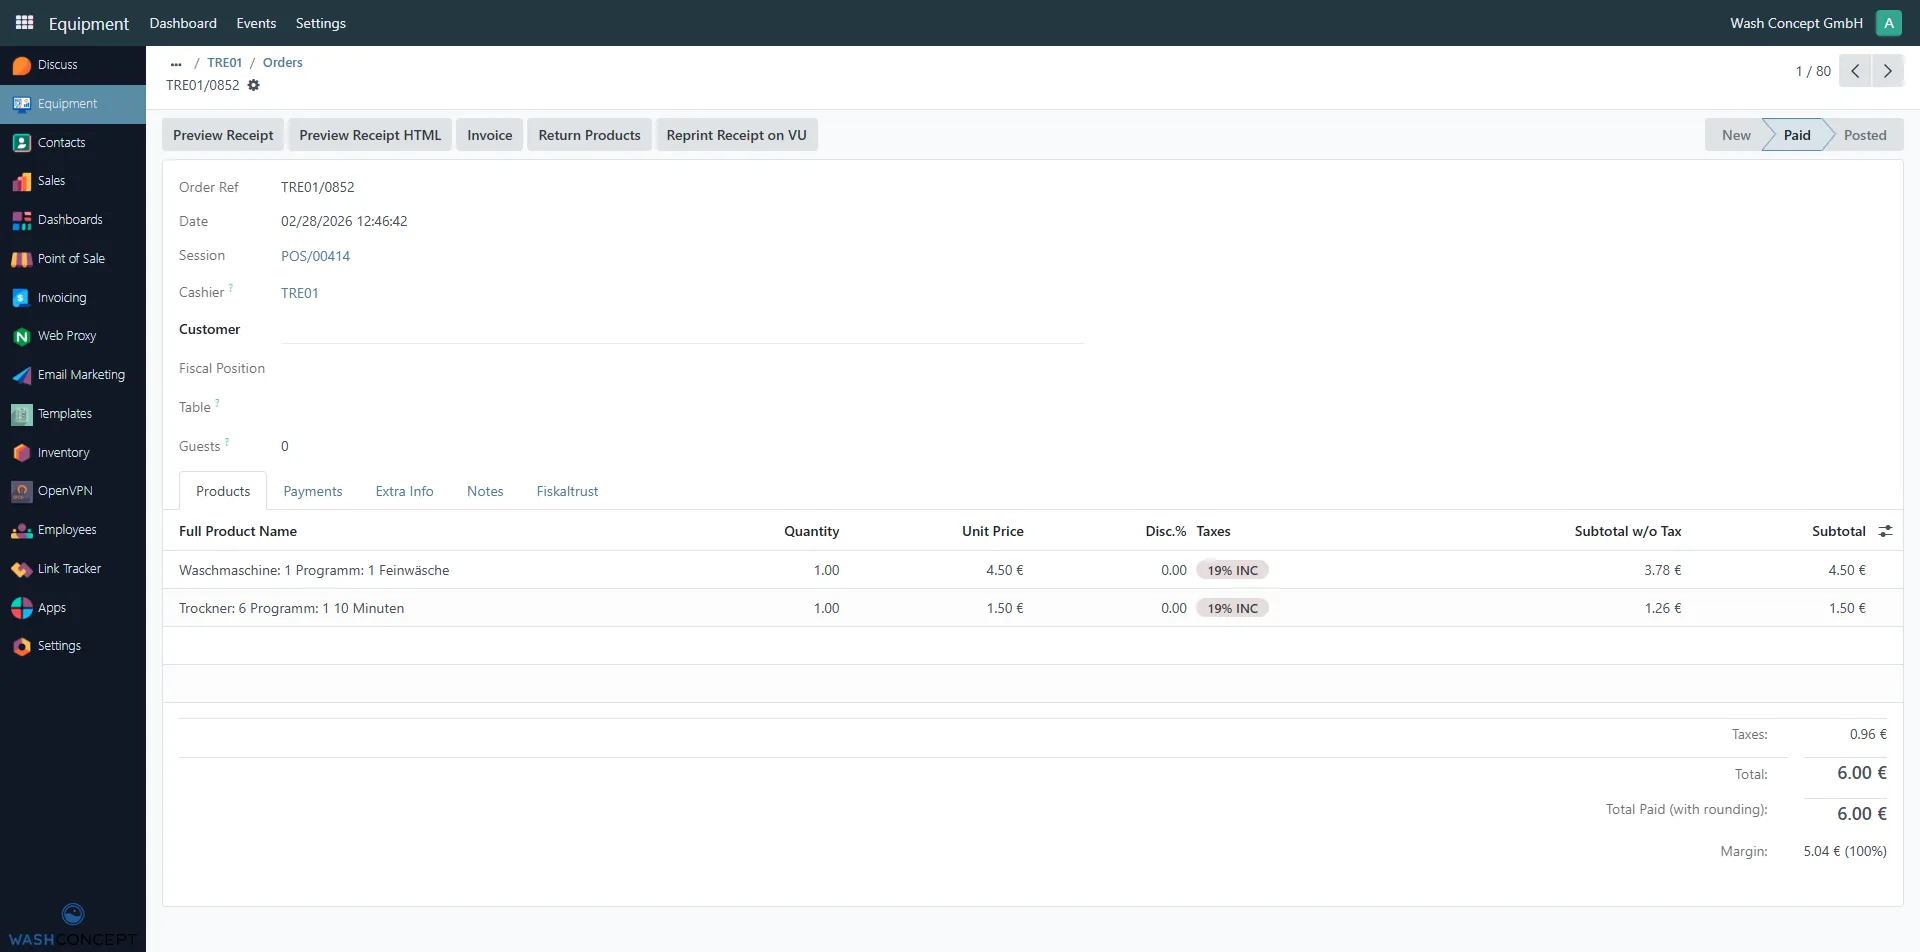
- Verify:
- Payment details
- Timestamps
- Receipt generation
- others